Installing an RFID system powered by Arduino might be a fantastic method to increase security for your project or house. It is a rather easy process that calls for some familiarity with programming and electronics.
In this blog post, we'll give you all the information you need to build an Arduino RFID system. We'll discuss things like the necessary components, how to set up the RFID reader, program the RFID system, and test it out before using it for what it was designed to do. Using our guide and a little effort, you can easily build your own unique Arduino RFID system.
What is an Arduino RFID System ?
An electronic device defined as an Arduino RFID system tracks and identifies items using Radio Frequency Identification (RFID) technology. It is a very helpful tool for applications including automation, security, and data collection. Users can rapidly identify and authenticate goods or people using RFID tags or cards by swiping the tag or card over a reader. The system has a number of benefits when an Arduino board serves as the system's foundation. By writing your own code for the board's microcontroller, you may quickly and easily modify and personalize your system.As you only need a few parts, including an antenna, reader module, and tags or cards, the cost of setting up such a system is also quite minimal when compared to alternative solutions like PIR sensors or CCTV systems. You have a lot of alternatives when it comes to setting up your RFID system because Arduino boards work with a variety of scanners.
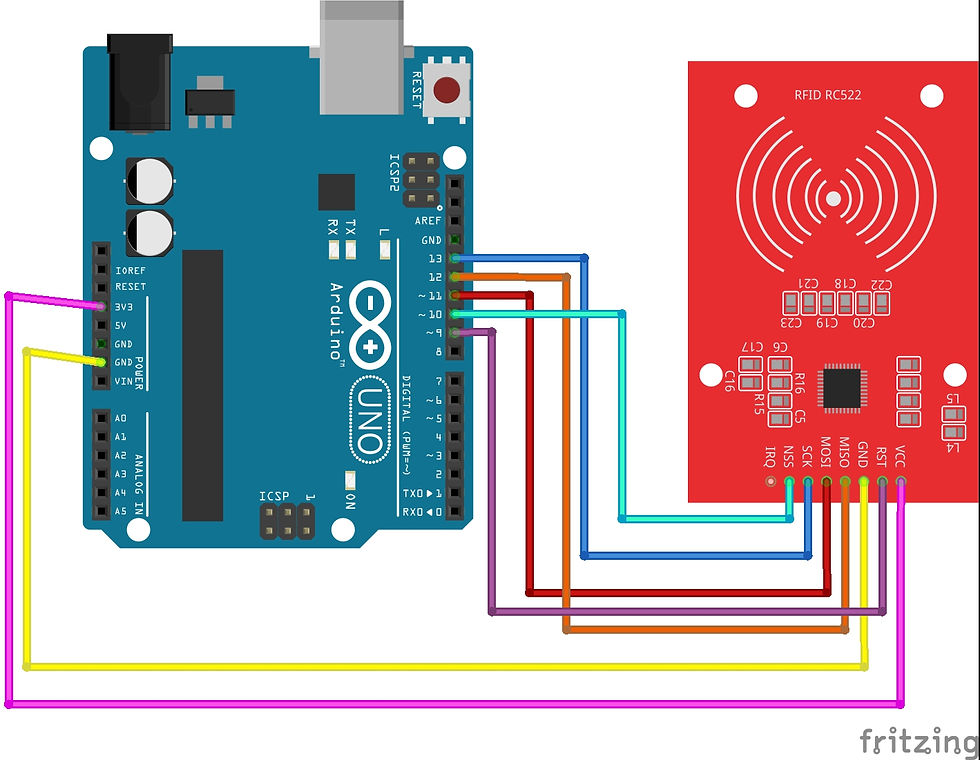
Photo by Fritzing
Components Needed to Create an Arduino RFID System?
The components needed for an Arduino-based RFID system include:
Arduino Board : This serves as the focal point for all inter-component communication; it receives data from inputs like switches or buttons and transmits signals out to outputs like LEDs or LCD panels.
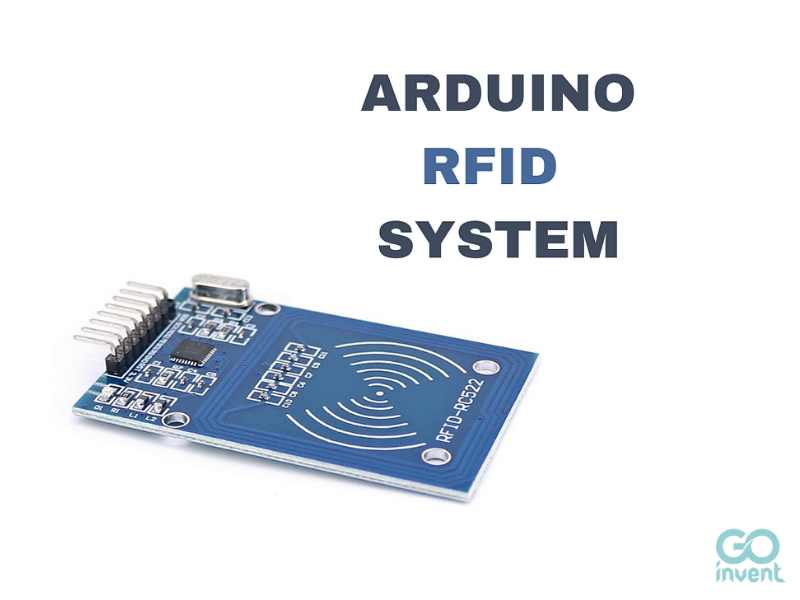
RFID Reader Module : This is in responsible for reading data from RFID tags or cards when they are in range; typically, these modules have antennas that will enhance signals sent by tags or cards so that the module itself can read them properly.
Antenna : Active tags and cards generate electromagnetic waves, which are picked up by an antenna and transmitted to the reader module for processing. This makes sure that only authorized objects can be confirmed before entering protected areas or systems where authentication is necessary.
RFID Tags : These are tiny devices that are used for identification; active tags have a power source of their own, whereas passive tags depend on energy from readers nearby to send out signals containing distinctive identification codes that can be compared against pre-programmed databases to ensure accurate authentication processes.
Power Supply : In order for all of these parts to function properly, they must be powered up. Typically, this involves connecting your setup to a power source via USB, such as a battery or wall outlet.
Preparing the Arduino Board
Your Arduino board needs to be connected to a computer before you can program it. Either a USB connection or a serial connection can be used for this. Connect your computer's USB port with the USB cable's other end plugged into any available connector on your Arduino board to establish a USB connection. Open the Arduino IDE (Integrated Development Environment) program that was installed on your computer after connecting your Arduino board. The Arduino board will be instantly detected and recognized by the IDE.
Installing the Arduino Software
Once the IDE software is launched, extra libraries must be installed for it to function with an RFID reader and tags. Fortunately, the installation procedure is pretty simple and only needs a few mouse clicks on the IDE's interface to complete :-
First, open up “Tools > Manage Libraries…” from within the IDE’s menu bar.
Then search for “RFID by Miguel Balboa” from within this window.
Next click “Install” beside this library.
Finally click “Close” once its installation has completed successfully.
Once this library has been installed onto your system you are now ready begin programming with an RFID reader.
Setting Up the RFID Reader.
The first step in setting up an Arduino RFID system is connecting the RFID reader to the Arduino board. To do this, use a USB cable or a serial connection and connect it to one of the available digital ports on the Arduino board. Make sure that you have selected the correct port type (e.g., Serial1 or SPI) for your particular reader before proceeding. Once connected, power up both devices and test them using an appropriate program or command line interface.
Installing the RFID Library.
Once you have connected your RFID reader and powered up your devices, you need to install a library that will enable communication between them. The most popular libraries for controlling an Arduino-based RFID system are MFRC522 and Adafruit_PN532 libraries which can be found online with detailed documentation on how to set them up correctly depending on your specific device type and setup configuration requirements. Once installed, these libraries will give you access to all of their built-in functions so that you can configure, control, and read data from your new system with ease!
Programming the RFID System
The writing of the code that will regulate the system's operation is the first stage in programming your Arduino RFID system. The microcontroller will be instructed by the code on how to react when an RFID tag is detected as well as which pins on the board it should be listening to. A straightforward text editor like Notepad++ or an integrated development environment (IDE), like the Arduino IDE, can be used for this. Make sure all of your components are correctly defined at the top of your application while writing your code. All variables and constants that you'll utilize throughout your program must also be defined.
Code for Arduino RFID System
/*
 *
 * All the resources for this project: http://randomnerdtutorials.com/
 * Modified by Rui Santos
 *
 * Created by FILIPEFLOP
 *
 */

#include <SPI.h>
#include <MFRC522.h>

#define SS_PIN 10
#define RST_PIN 9
MFRC522 mfrc522(SS_PIN, RST_PIN);   // Create MFRC522 instance.

void setup()
{
  Serial.begin(9600);   // Initiate a serial communication
  SPI.begin();      // Initiate  SPI bus
  mfrc522.PCD_Init();   // Initiate MFRC522
  Serial.println("Approximate your card to the reader...");
  Serial.println();

}
void loop()
{
  // Look for new cards
  if ( ! mfrc522.PICC_IsNewCardPresent())
  {
    return;
  }
  // Select one of the cards
  if ( ! mfrc522.PICC_ReadCardSerial())
  {
    return;
  }
  //Show UID on serial monitor
  Serial.print("UID tag :");
  String content= "";
  byte letter;
  for (byte i = 0; i < mfrc522.uid.size; i++)
  {
     Serial.print(mfrc522.uid.uidByte[i] < 0x10 ? " 0" : " ");
     Serial.print(mfrc522.uid.uidByte[i], HEX);
     content.concat(String(mfrc522.uid.uidByte[i] < 0x10 ? " 0" : " "));
     content.concat(String(mfrc522.uid.uidByte[i], HEX));
  }
  Serial.println();
  Serial.print("Message : ");
  content.toUpperCase();
  if (content.substring(1) == "BD 31 15 2B") //change here the UID of the card/cards that you want to give access
  {
    Serial.println("Authorized access");
    Serial.println();
    delay(3000);
  }

 else   {
    Serial.println(" Access denied");
    delay(3000);
  }
}
You can start writing your main loop code, which will run continually when your Arduino RFID system is running, once this setup work is finished. The main loop should determine whether or not the reader has sent any new data, and if so, what sort of data it has sent—either an ID number linked to a specific tag, or an error message indicating a problem with the reader and tag's communication. Several actions may be conducted depending on the type of data that your loop function received. For instance, if a valid ID number was received, a welcome message could be displayed on an LCD screen that is linked to the Arduino board.
Uploading the Program to the Arduino Board
Once you have written and tested your code thoroughly using a simulator such as Proteus Design Suite, it’s time to upload it onto your Arduino board so that it can begin running automatically when powered up or reset. To do this you simply have to connect up a USB cable between your computer and board before clicking on “Upload” within either Notepad++ or whichever IDE you’re using for programming purposes – usually just pressing F10 key does this job quickly !
Testing the Arduino RFID System
To ensure that your reader is working properly, you should test it against an RFID tag. Place the tag in front of the reader, and make sure that the information displayed on the serial monitor matches up with the data stored on your tag. If not, it’s likely that there’s a problem with either your hardware or software setup.
Troubleshooting Tips
If you encounter any problems while testing your Arduino RFID system, here are a few troubleshooting tips to help you out:
Make sure all of your connections are secure and correctly wired.
Double-check if all components are compatible with each other and supported by the Arduino IDE.
Check if you have installed all necessary libraries correctly (including updates).
Ensure that all components are powered on and running correctly before attempting to upload code to the board or read any tags.
Verify that you have written correct code for your specific project by double-checking it against tutorials or examples online.
Conclusion
Your projects can benefit greatly from an additional layer of ease and security thanks to the Arduino RFID System. Now that you have the necessary parts, step-by-step instructions for setting up and programming the system, and troubleshooting advice, you can easily build your own secure Arduino RFID system. Now that you have this information, you are prepared to investigate all the opportunities that come with having a dependable RFID setup! You won't regret it, so go ahead and dive into the realm of automation and security.
Check out our website for more tutorials and resources if you want to learn more about programming for Arduino or other electronic parts.


Commentaires