
This article explains how to interface Stepper Motor with Arduino, followed by discussing different types of stepper motors and the pros and cons of each.
Concept
A stepper motor is a type of electric motor that moves in discrete steps or increments, as opposed to continuously rotating like a traditional DC motor.
It's widely used in various applications that require precise control over motion, such as robotics, 3D printers, CNC machines, and more.
The basic concept behind a stepper motor involves the interaction between the rotor (the moving part) and the stator (the stationary part), which contains coils of wire.
These coils are energized in a specific sequence to generate magnetic fields that attract or repel the rotor's permanent magnets, causing the rotor to move in steps.

Image Source: wikimedia
The type of motor being used determines how many steps are required for the motor's shaft to complete one full turn; the most popular types are unipolar and bipolar stepper motors, both of which can require up to 200 steps per revolution.

Image Source Techexplorations.
Types of Stepper motors
Bipolar Stepper Motors: These motors have two coils per phase, and the current direction in each coil needs to be reversed to control the motion. This is usually achieved using an H-bridge circuit or a specialized driver.
Unipolar Stepper Motors: These motors have multiple coils per phase, but the center taps of each coil are wired together to create a common connection. This simplifies the control circuitry but may result in slightly less torque compared to bipolar motors.
The control of a stepper motor involves sending a sequence of electrical pulses to the coils. The sequence and timing of these pulses determine the direction and speed of the motor's rotation.
Most Common Stepping Modes
Full Step Mode: In this mode, one coil is energized at a time, creating distinct steps. It provides good torque but might not be as smooth as other modes.
Half Step Mode: This mode alternates between energizing one coil and two coils, resulting in smoother motion but with slightly less torque than full step mode.
Microstepping Mode: This mode provides even finer control by energizing the coils with varying current levels, allowing the rotor to take steps that are fractions of the full step angle. This results in very smooth motion and improved positioning accuracy, at the cost of reduced torque at higher microstep levels.
Advantages of Stepper Motors
Stepper motors provide many benefits compared to other types of electric motors, such as:
Low noise DC brushed or brushless models are available.
Quick response times for starting/stopping.
Does not require feedback loops or complex control systems.
Easy integration into robotic systems.
Excellent consistency from one step to the next without the need for realignment following prolonged periods of inactivity or power outages.
Disadvantages of Stepper Motors
However there are some drawbacks associated with using a stepper motor such as :-
Limited torque production at high speeds due to increased resistance within the motor windings.
Winding temperature increases resulting in decreased performance.
Susceptibility to resonance issues during high speed operation
Inability to handle large inertial loads.
Poor acceleration profiles due to high inductance values.
Magnetic detent forces causing vibration issues at rest points.
Limited availability/costs associated with specialised components required for larger designs.
Connecting 28BYJ-48 Stepper Motor with ULN2003 driver and Arduino Uno

The 28BYJ-48 is a small, inexpensive, geared stepping motor that runs on 5 volts. It offers reasonable torque for its size at rotational rates of roughly 15 rotations per minute (RPM) due to the gear reduction ratio of approximately 64:1.
It's crucial to know what parts are necessary for a full connection configuration when attaching a stepper motor to an Arduino. We will need the following components for a successful connection :-
Now It's time to start connecting the components once you've gathered all of the necessary components.
The motor includes four wire coils that are powered sequentially in order to turn the magnetic motor shaft. With the full-step approach, each step powers two of the four coils.
This approach is used by the Arduino IDE's built-in default stepper library. According to the 28BYH-48 datasheet, the half-step approach is the preferred way to drive this stepper, in which we first power coil 1 alone, then coil 1 and coil 2 together, then coil 2 alone, and so on. This results in 8 distinct signals with 4 coils, as seen in the table below :-

The stepper motor cable plugs up to a five wire connector on one side of the board, which also has four LEDs to show which coil is powered at any one time. It always helps that the motor cable only has one direction of travel.
UNL2003 Board has a motor on/off jumper on the side (keep it on to enable power to the stepper). The two pins below the 4 resistors, is where you provide power to the stepper.The ULN2003 chip is located in the center of the circuit board.
The four control inputs for the Arduino should be connected to the four digital pins at the bottom. Now, we will hook the Stepper motor with Arduino by attaching the ULN2003 drivers IN1, IN2, IN3, and IN4 to the Arduino Uno's digital pins 3, 4, 5, and 6 correspondingly. The positive lead from a reliable 5-12V battery pack will then be connected to the "+" pin of the ULN2003 driver, and the ground will be connected to the "-" pin.
Note: Make sure the "on/off" jumper is turned on next to the "-" pin. Connect the grounds if you plan to power the Arduino with a separate battery pack.
Implementing the Arduino Code for Stepper Motors.
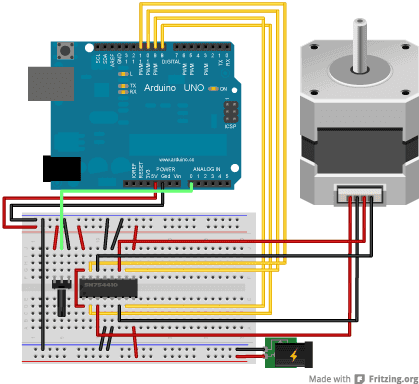
The first step in implementing the Arduino code for stepper motors is to connect the stepper motor to the Arduino board. The wiring diagram below shows how to wire up a typical bipolar stepper motor with an Arduino Uno :-
Once connected, you will need to use a library such as AccelStepper or PololuStepper in order to control your steppers from within your program. Both libraries are available for free download on GitHub, and instructions for installation can be found in their respective README files.
Arduino Installation and Configuration
The installation and configuration of the Arduino IDE is the starting point in using Arduino to program a stepper motor. To do this : -
Visit the official Arduino website and download the most recent version of their software.
Open the IDE after downloading it, then choose File > Preferences from the toolbar at the top of the screen.
This will open a window where you can change a number of project-related options, including board type and serial port connection settings.
Arduino Libraries for Stepper Motors.
After creating your development environment, you must install any stepper motor libraries that are required on your system. These libraries give you access to unique functions that let you regulate a stepper motor's behavior in various ways, such as speed or rotational direction. AccelStepper is the most widely used library for controlling stepper motors, and it can be accessed on Github or in a number of online materials about utilizing an Arduino with stepper motors.
Arduino Code for Stepper Motor.
#include <AccelStepper.h>
#define HALFSTEP 8

// Motor pin definitions
#define motorPin1  3     // IN1 on the ULN2003 driver 1
#define motorPin2  4     // IN2 on the ULN2003 driver 1
#define motorPin3  5     // IN3 on the ULN2003 driver 1
#define motorPin4  6     // IN4 on the ULN2003 driver 1

// Initialize with pin sequence IN1-IN3-IN2-IN4 for using the AccelStepper with 28BYJ-48
AccelStepper stepper1(HALFSTEP, motorPin1, motorPin3, motorPin2, motorPin4);

void setup() {
  stepper1.setMaxSpeed(1000.0);
  stepper1.setAcceleration(100.0);
  stepper1.setSpeed(200);
  stepper1.moveTo(20000);

}//--(end setup )---

void loop() {

  //Change direction when the stepper reaches the target position
  if (stepper1.distanceToGo() == 0) {
    stepper1.moveTo(-stepper1.currentPosition());
  }
  stepper1.run();
}
Video
Troubleshooting Tips
As with any type of programming project, there may be times when you run into problems when attempting to implement your Arduino code for operating a stepper motor system correctly. Don't worry though, these problems are typically pretty simple to fix! Check all of the electrical connections between components (including the power supply), confirm that all relevant libraries have been installed successfully, ensure that all pins utilized in the project are defined correctly within the program's setup(), etc., if something isn't working as intended. Moreover, if anything seems off during serial output testing, be sure to remark it so that it may be fixed right away before any implementation attempts are made!
Conclusion
In conclusion, using stepper motors for your projects might be a terrific method to create precise and regulated motion. Controlling these motors is simple and uncomplicated with the aid of Arduino. From comprehending what stepper motors are and how they operate to creating code and putting it into practice on the Arduino platform, we have gone over all the necessary steps needed in setting up Arduino for stepper motor control. Why not use your imagination and discover new applications for stepper motors now that you are aware of all this? Let's get to work creating something incredible!


Comments