
The Arduino GY521 Gyro and Accelerometer are powerful tools that can be used to measure, monitor, and control motion in a variety of applications. From virtual reality to robotics, the ability to accurately measure and control movement is essential for any project. In this blog post, we will explore how to utilize an Arduino GY521 Gyro and Accelerometer for maximum impact. We will discuss the unique features of this device, its benefits when compared with other solutions, how it can be set up and programmed for various projects, as well as some application examples. By the end of this post readers will have a complete understanding of how to use an Arduino GY521 Gyro and Accelerometer for their own projects.
Overview of Arduino GY521 Gyro and Accelerometer
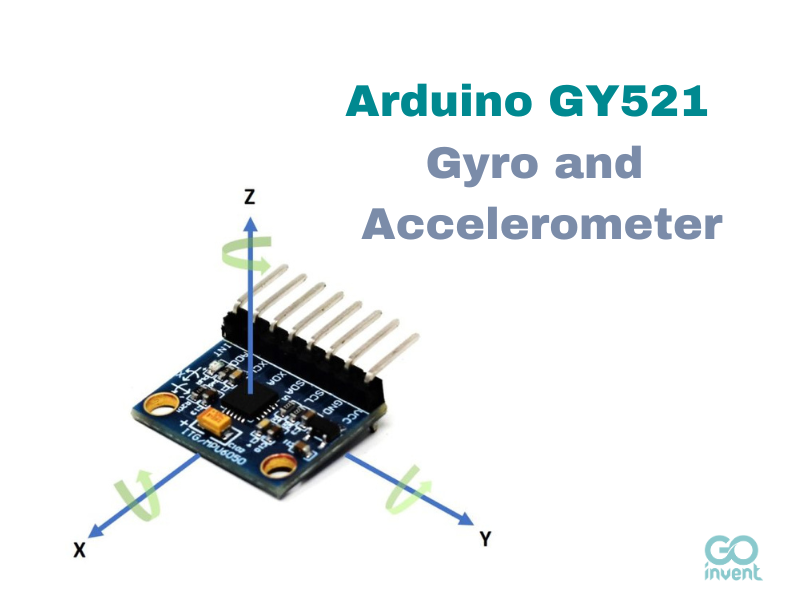
The accelerometer and gyroscope on the Arduino GY521 are parts of the same instrument that also measures temperature, tilt angle, altitude angle, and other physical characteristics. It combines a gyroscope and an accelerometer, which measure angular velocity and acceleration respectively. Each axis of the GY521's 6-axis motion sensor system has a 16-bit resolution. Moreover, it has built-in temperature adjustment to enhance accuracy over time.
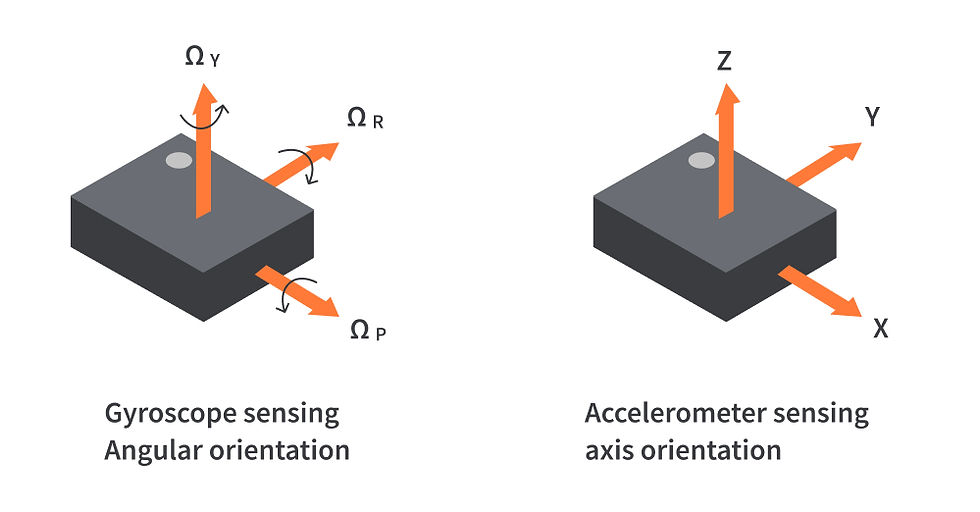
Photo by CircuitBread
What makes Arduino GY521 Gyro and Accelerometer Unique ?
The Arduino GY521 Gyro and Accelerometer has several features that make it stand out from similar products on the market today :-
Cost efficient : The GY512 can be purchased for under $10 USD making it an affordable option for hobbyists or those just starting out in robotics or electronics engineering projects.
Easy to set up : Using only 3 wires (VCC power supply voltage pin, ground pin, signal output pin), this makes setup much easier than many other models on the market.
Excellent sensitivity : The enhanced sensitivity and accuracy of the Arduino GY521 Gyro and Accelerometer are well known. This is accomplished by utilising MEMS (Microelectromechanical Systems) technology, which enables the device's gyroscope and accelerometer components to provide greater precision data.
Long battery life : Due to its low power consumption mode allowing it to run off of small batteries for extended periods of time without needing to be recharged or replaced as often as normal sensors would need to be. This extended battery life makes it an excellent choice for applications that require continuous operation or have limited access to power sources. Additionally, the device is powered by 3V – 5V DC voltage, making it compatible with most standard microcontrollers available today.
Setting Up and Using an Arduino GY521 Gyro and Accelerometer
Installing an Arduino GY521 gyro and accelerometer is relatively simple, although it does require some technical knowledge and careful attention to detail :-
To install the sensor, begin with a breadboard – this provides a flat surface for mounting the components of your system.
Attach two wires to each terminal on the GY521 board; one wire should be connected to voltage (Vcc) while the other should be ground (GND).
Next, connect three additional wires between Vcc and analog pins A4, A5, and A6 on your Arduino board.
Finally, attach one more wire from pin D2 on your Arduino board to a digital input/output port on your breadboard as this will provide power for reading data from the gyroscope.
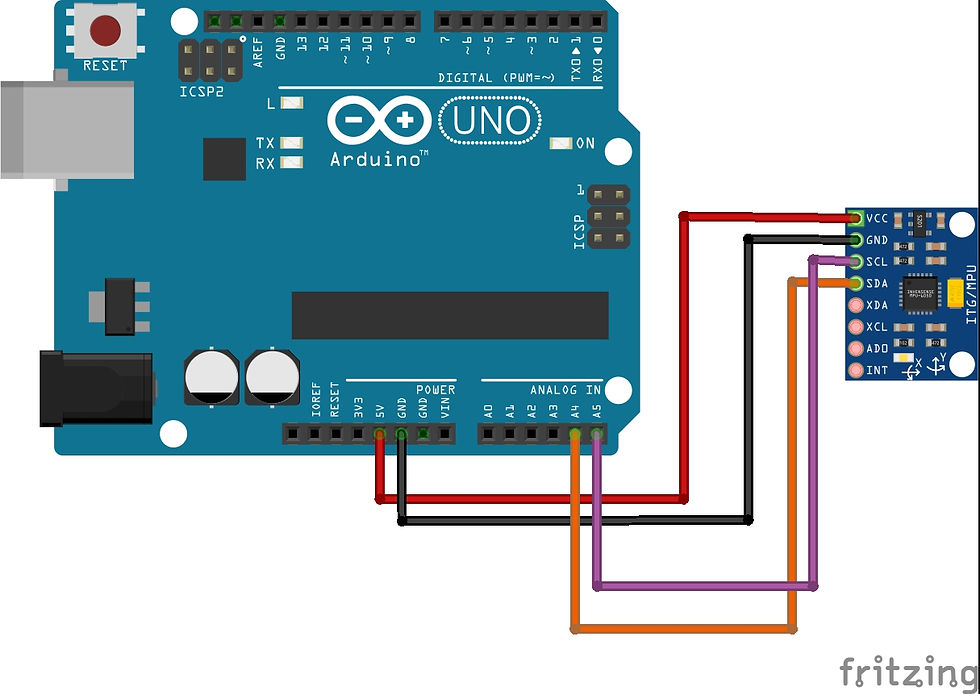
Photo by Fritzing
Once all of these connections have been made, you can use an appropriate software program or library to program your system according to specific instructions outlined in its documentation.
Connecting the Arduino GY521 Gyro and Accelerometer to a Computer
To read data from your sensors after you've installed them correctly on the breadboard, you'll need to link them to a computer. Depending on the type of connection method you prefer using most frequently when programming microcontrollers like Arduinos, this can be accomplished by connecting each wire connected to Vcc or ground with either their own dedicated USB cable or through other connection cables that are compatible with both computers and Arduinos, such as Serial UART TTL cables or I2C/SPI cables.
Programming the Arduino GY521 Gyro and Accelerometer
Now that we've got our sensors connected up properly with our computer, it's time for us to start programming them. Before doing so, however we must first make sure that any relevant libraries have been correctly imported into our project depending upon what type of language we're using - if it's C++ then importing Wire might be necessary. We will also want to ensure that any variables used throughout our code are appropriately initialised before beginning execution too. From here onwards it is simply a matter of writing code according how we wish our system behave given certain inputs- whether they come directly from user input or indirectly via sensor readings.
Arduino code
// (c) Michael Schoeffler 2017, http://www.mschoeffler.de
#include "Wire.h" // This library allows you to communicate with I2C devices.
const int MPU_ADDR = 0x68; // I2C address of the MPU-6050. If AD0 pin is set to HIGH, the I2C address will be 0x69.
int16_t accelerometer_x, accelerometer_y, accelerometer_z; // variables for accelerometer raw data
int16_t gyro_x, gyro_y, gyro_z; // variables for gyro raw data
int16_t temperature; // variables for temperature data
char tmp_str[7]; // temporary variable used in convert function
char* convert_int16_to_str(int16_t i) { // converts int16 to string. Moreover, resulting strings will have the same length in the debug monitor.
  sprintf(tmp_str, "%6d", i);
  return tmp_str;
}
void setup() {
  Serial.begin(9600);
  Wire.begin();
  Wire.beginTransmission(MPU_ADDR); // Begins a transmission to the I2C slave (GY-521 board)
  Wire.write(0x6B); // PWR_MGMT_1 register
  Wire.write(0); // set to zero (wakes up the MPU-6050)
  Wire.endTransmission(true);
}
void loop() {
  Wire.beginTransmission(MPU_ADDR);
  Wire.write(0x3B); // starting with register 0x3B (ACCEL_XOUT_H) [MPU-6000 and MPU-6050 Register Map and Descriptions Revision 4.2, p.40]
  Wire.endTransmission(false); // the parameter indicates that the Arduino will send a restart. As a result, the connection is kept active.
  Wire.requestFrom(MPU_ADDR, 7*2, true); // request a total of 7*2=14 registers

  // "Wire.read()<<8 | Wire.read();" means two registers are read and stored in the same variable
  accelerometer_x = Wire.read()<<8 | Wire.read(); // reading registers: 0x3B (ACCEL_XOUT_H) and 0x3C (ACCEL_XOUT_L)
  accelerometer_y = Wire.read()<<8 | Wire.read(); // reading registers: 0x3D (ACCEL_YOUT_H) and 0x3E (ACCEL_YOUT_L)
  accelerometer_z = Wire.read()<<8 | Wire.read(); // reading registers: 0x3F (ACCEL_ZOUT_H) and 0x40 (ACCEL_ZOUT_L)
  temperature = Wire.read()<<8 | Wire.read(); // reading registers: 0x41 (TEMP_OUT_H) and 0x42 (TEMP_OUT_L)
  gyro_x = Wire.read()<<8 | Wire.read(); // reading registers: 0x43 (GYRO_XOUT_H) and 0x44 (GYRO_XOUT_L)
  gyro_y = Wire.read()<<8 | Wire.read(); // reading registers: 0x45 (GYRO_YOUT_H) and 0x46 (GYRO_YOUT_L)
  gyro_z = Wire.read()<<8 | Wire.read(); // reading registers: 0x47 (GYRO_ZOUT_H) and 0x48 (GYRO_ZOUT_L)

  // print out data
  Serial.print("aX = "); Serial.print(convert_int16_to_str(accelerometer_x));
  Serial.print(" | aY = "); Serial.print(convert_int16_to_str(accelerometer_y));
  Serial.print(" | aZ = "); Serial.print(convert_int16_to_str(accelerometer_z));
  // the following equation was taken from the documentation [MPU-6000/MPU-6050 Register Map and Description, p.30]
  Serial.print(" | tmp = "); Serial.print(temperature/340.00+36.53);
  Serial.print(" | gX = "); Serial.print(convert_int16_to_str(gyro_x));
  Serial.print(" | gY = "); Serial.print(convert_int16_to_str(gyro_y));
  Serial.print(" | gZ = "); Serial.print(convert_int16_to_str(gyro_z));
  Serial.println();

  // delay
  delay(1000);
}
Application Examples of the Arduino GY521 Gyro and Accelerometer
The Arduino GY521 Gyro and Accelerometer can be used in the following virtual reality applications, allowing users to interact with the environment through motion tracking : -
UAVs : For unmanned aerial aircraft, the Arduino GY521 Gyro and Accelerometer is also helpful (UAVs). With the use of this technology, UAVs can precisely gauge their pitch, roll, yaw, and linear acceleration even when traveling at high speeds or performing abrupt maneuvers. In difficult circumstances like windy winds or crowded metropolitan areas where GPS signals cannot reliably reach, it is a vital tool for navigation and flight control.
Robotics : Due to its capability to correctly and quickly detect even the smallest movements, the Arduino GY521 Gyro and Accelerometer has many uses in robotics. This gadget measures angular velocity during operation with great precision, allowing robotic arms outfitted with it to operate more precisely than ever before. Because to its accurate measurements of linear acceleration from all directions, even while stationary or moving slowly, this technology also enables robots to navigate obstacles on their own without the aid of additional sensors like laser range finders or cameras.
Conclusion
All in all, Arduino GY521 gyro and accelerometer is a useful tool for hobbyists, professionals, and makers alike. Its increased sensitivity and accuracy make it ideal for applications such as virtual reality, UAVs, robotics, and more. With its long battery life and cost-efficiency, the Arduino GY521 Gyro and Accelerometer is a great choice for anyone looking to explore new possibilities with their projects. After familiarising yourself with the setup process of the Arduino GY521 Gyro and Accelerometer you can begin to reap the benefits that this device has to offer.In conclusion, an Arduino GY521 Gyro and Accelerometer provides an excellent opportunity to create innovative projects while also providing an increase in sensitivity levels and accuracy compared to other devices on the market. It’s easy setup makes it possible for users of all levels of experience to use this device effectively in order to bring their ideas into reality.


Comments